Fly Gemini CanBoot bootloader for CAN bus
Edit me
Configuring and installing CanBoot bootloader for CAN bus
Install CanBoot package
-
ssh to your klipper host console
- Clone the CanBoot firmware to your Klipper Host
cd ~/ git clone https://github.com/Arksine/CanBoot - From your Fluidd or Mainsail web UI Edit Moonraker.conf and add the following at the bottom to allow moonraker to manage updates to the CAN bus software.
[update_manager CanBoot]
type: git_repo
path: ~/CanBoot
origin: https://github.com/Arksine/CanBoot.git
is_system_service: False
Compile CanBoot firmware
- cd to the Canboot directory
cd CanBoot - Run make clean
make clean - Open menuconfig
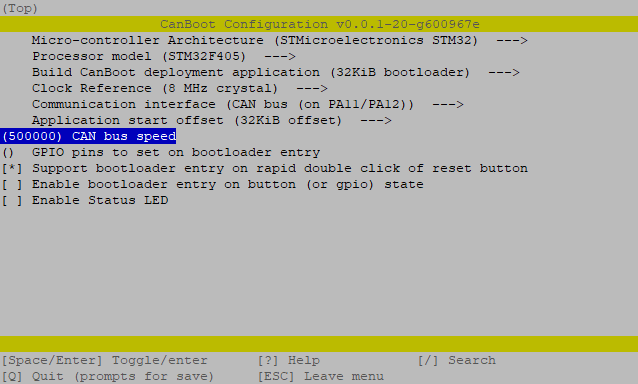
make menuconfig - Set the following settings
-
Quit and save the configuration
- Run the make command to compile the firmware
make - You should now have a canboot.bin and a deployer.bin file at ~/CanBoot/out/
Flash CanBoot to the Fly Gemini V2 MCU
- ftp to your Fly Gemini V2 with an FTP client like FileZilla
- connect with the following settings
- Hostname: sftp://flygemini.local
- Username: fly
- Password: Enter your password. The default Gemini password is ‘mellow’
- Port: 22
- Click ‘Quickconnect’
- open the folder ‘/home/fly/CanBoot/out’
- download deployer.bin to your PC
- connect with the following settings
-
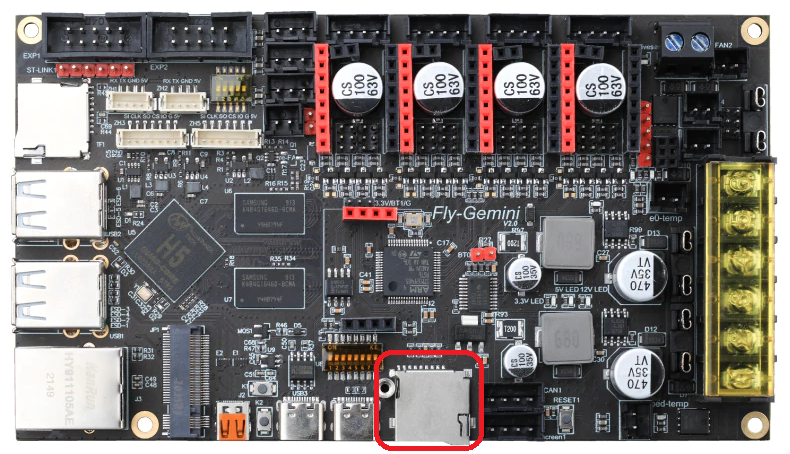
place the MCU MiniSD card into a card reader and connect it to your PC.
-
Copy the deployer.bin file to the SD card
-
rename deployer.bin to firmware.bin
-
Eject the SD card from the PC
-
Insert the SD card into the MCU SD card Slot.

CanBoot Menu Config CAN -
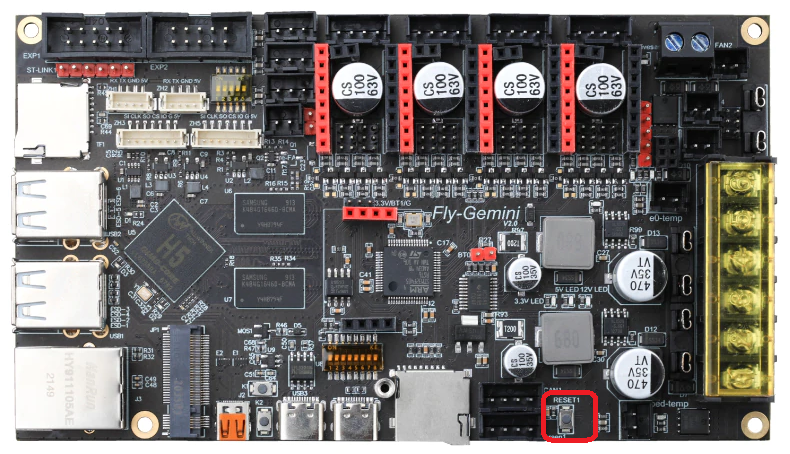
Press the MCU reboot button

CanBoot Menu Config CAN -
Wait a few minutes
-
Open a putty SSH session to the and log on
- run canboot query verify the MCU is up on the CAN bus
~/CanBoot/scripts/flash_can.py -i can0 -q
- Note the UUID for flashing klipper with CanBoot in the Klipper for CAN bus configuration section.
