Fly-Super8 CanBoot bootloader for USB
Edit me
Configuring and installing CanBoot bootloader for USB
Warning: Super 8 Version 1.0 does not support USB to CAN bridge mode.
Overview
Katapult allows you to update your toolboards via USB, so no rebooting and rewiring to USB is necessary. We recommend using CANboot for this additional convenience.
Install Katapult package
Note: The bootloader software formerly known as CanBoot has been renamed to Katapult
-
ssh into your klipper host console
- Clone the Katapult firmware to your Klipper Host
cd ~/ git clone https://github.com/Arksine/katapult - From your Fluidd or Mainsail web UI Edit Moonraker.conf and add the following at the bottom to allow moonraker to manage updates to the CAN bus software.
[update_manager Katapult]
type: git_repo
path: ~/katapult
origin: https://github.com/Arksine/katapult.git
is_system_service: False
Compile Katapult firmware
-
cd to the Katapult directory ``` cd katapult
- Run make clean
make clean - Open menuconfig
make menuconfig - Set the following settings
- Micro-controller Architecture : STMicroelectronics STM32
- Processor model: STM32F407
- Build Katapult deployment application: 32KiB bootloader
- Clock Reference: 8 MHz crystal
- Communication interface - USB on PA11/PA12
-
Application start offset - 32KiB offset
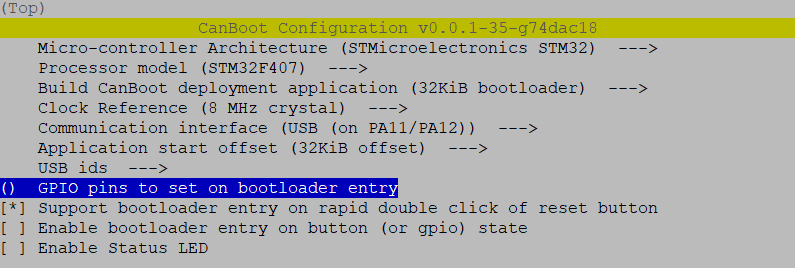
CanBoot Menuconfig
-
Quit and save the configuration
- Run the make command to compile the firmware
make -j4 - You should now have a deployer.bin file at ~/katapult/out/

Flash Katapult to the Fly-Super8 MCU
- ftp to your klipper host with an FTP client like FileZilla
- open the folder ‘~/katapult/out’
- download deployer.bin to your PC
- place the MCU MicroSD card into a card reader and connect it to your PC.
- ensure that the SD Card is formatted as Fat32. If in doubt use the SD Card Formatter.
- Copy the deployer.bin file to the root of the SD card
- rename deployer.bin to firmware.bin
- Eject the SD card from the PC
-
Insert the SD card into the MCU SD card Slot.
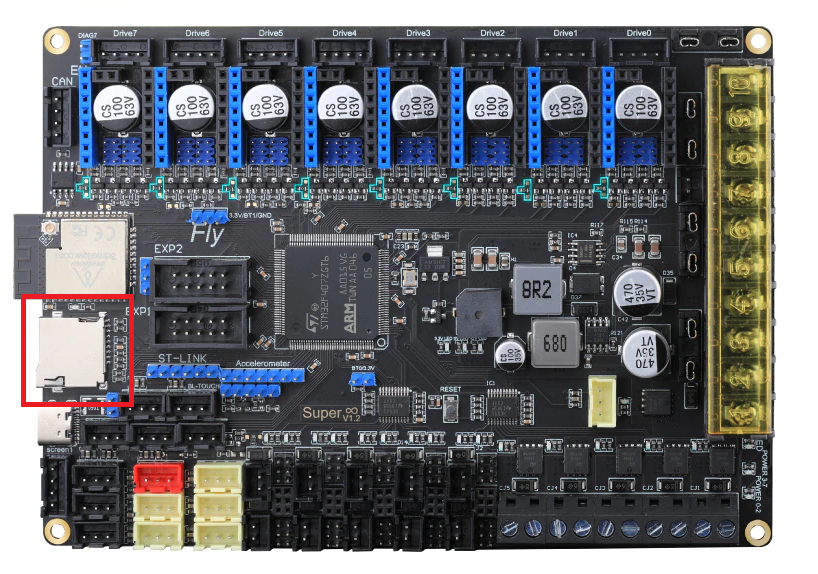
CanBoot Menuconfig -
Press the Fly-Super8 reboot button
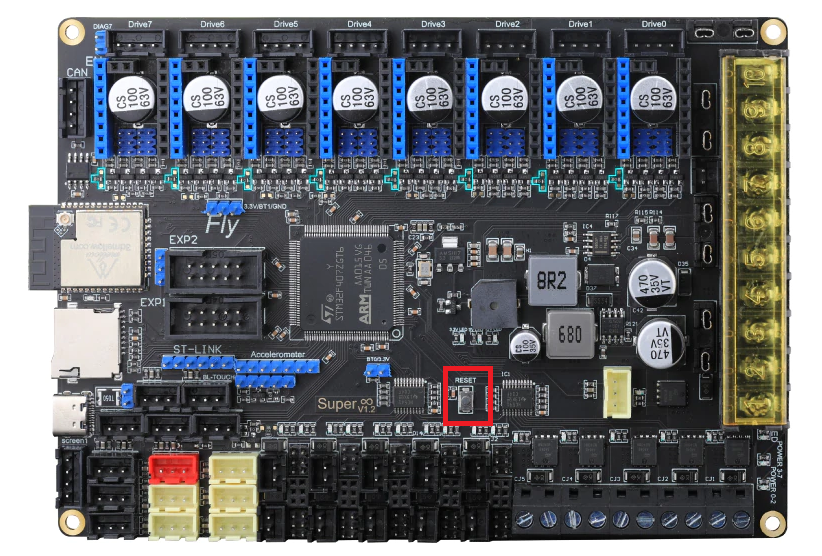
CanBoot Menuconfig - Wait a few minutes
-
Open a putty SSH session to the Fly-Super8 and log on
- run lsusb to verify the MCU has been discovered as a USB device


- Continue to the Klipper for USB configuration section