Klipper Configuration for the Fly SHT-36 V1 CAN bus tool board on USB
Edit me
Important: This guide assumes you have a working Klipper host installation on a Raspberry Pi or compatible device
Setup steps
Klipper firmware
Compile Klipper firmware for usb
Note: Repeat these steps if a klipper update requires flashing new firmware to the MCU.
- ssh to your klipper host console
- cd to the klipper directory
cd klipper - Run make clean
make clean - Open menuconfig
make menuconfig - Set the following settings
- Enable extra Low Level configuration options : Checked
- Micro Controller : STMicroelectronics STM32
- Processor Model: stm32f072
- Build: 8 Kib bootloader
- Clock Ref: 8 MHz crystal
- Comm Interface - USB on PA11/PA12
-
Application Offset 8 Kib
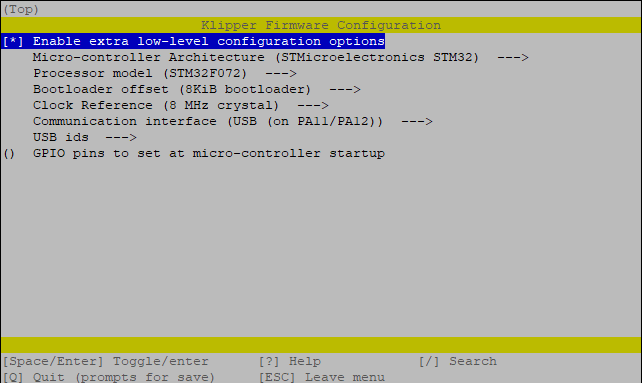
Klipper Menu Config USB - update this image
-
Quit and save the configuration
- Run Make to compile the firmware

make -j 4
Flash Klipper firmware with CanBoot over USB
- Find the Serial ID
ls /dev/serial/by-id/ -
Copy the ID containing ‘stm32f072xb’
- Run the make flash command to compile the firmware
python3 ~/CanBoot/scripts/flash_can.py -f ~/klipper/out/klipper.bin -d {Your serial ID here } - Example
python3 ~/CanBoot/scripts/flash_can.py -f ~/klipper/out/klipper.bin -d /dev/serial/by-id/usb-CanBoot_stm32f072xb_170038000650314D35323820-if00

- Your SHT-36 should now have klipper firmware loaded and be ready to use.
USB configuration
- Run the following command at the Klipper host SSH console to get the serial path for the SHT-36 tool board.
ls -l /dev/serial/by-id/
- Note the ID containing ‘stm32f072xb’
add screen shot here
- Add the following lines to your printer.cfg file replacing the USB ID with the one you copied in the last section.
[mcu sht]
serial: /dev/serial/by-id/{copy usb serial ID here}