Fly-Puppet with Raspberry Pi
Edit me
Configuring and installing Rasberry Pi for the Fly-Puppet
Mounting the Rasberry Pi to the Fly-Puppet
-
The Rasberry Pi mounts to the sockets on the bottom of the Fly-Puppet

Mounting the Raspberry to the Fly puppet

Write OS to SD or EMMC
- If you are using an SD card, mount the SD card on your PC.
- Chose an Operating system to load, It is recommended to use mainsailos or fluiddpi
- After the burning is completed, please do not start the system, complete the following settings
Post image Burn configuration
Perform these steps before starting up the Rasberry Pi
- Open the mounted EMMC Drive or SD card on your PC.
- Open the config.txt file in the /boot directory and add following two lines configuration
dtoverlay=pi3-miniuart-bt
dtoverlay=dwc2,dr_mode=host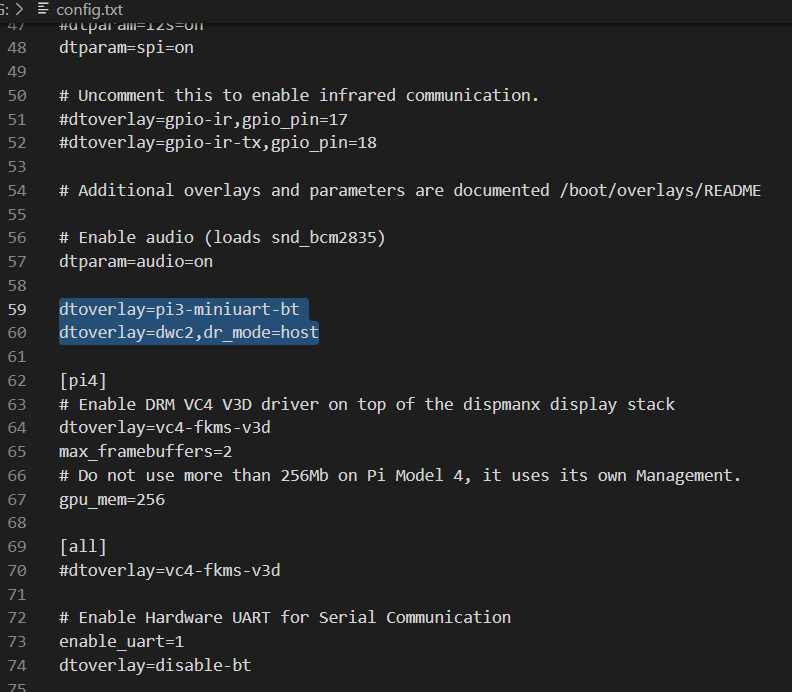
Edit config.txt - Create a new blank file under the boot disk, the file name is SSH , no suffix
- WIFI Setup
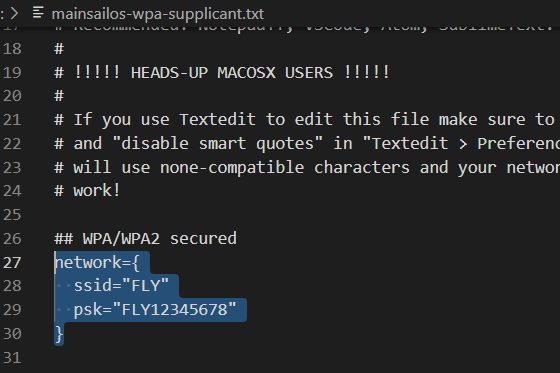
- MainsailOS modify /boot/mainsailos-wpa-supplicant.txt
- FluiddPi modify /boot/fluiddpi-wpa-supplicant.txt
- Delete the # in front of these 4 lines
- Change ssid and psk to your WiFi name and password respectively

Edit WIFI configuration file - The preparations are complete, If you used an SD card now you can install the SD card into Raspberry Pi and start it up

Compile Klipper firmware for Linux MCU
Note: Repeat these steps if a klipper update requires flashing new firmware to the MCU.
- ssh to your klipper host console
- cd to the klipper directory
cd klipper - Run make clean
make clean - Open menuconfig
make menuconfig - Set the following settings
- Enable extra Low Level configuration options : Un-Checked
-
Micro Controller : Linux Process

Configure Linux MCU Firmware
- Quit and save the configuration

Flash The Rasberry Pi as a Lunix MCU
- run the following command to flash the Rasberry Pi
sudo service klipper stop make flash sudo service klipper start - Add the following to your Fly-Puppet printer.cfg file to connect the Rasberry Pi as an MCU in klipper.
[mcu host]
serial: /tmp/klipper_host_mcu