How to update the klipper firmware running on a Fly-CDYv3 in USB mode
Edit me
Configuring and installing Klipper for USB
Compile Klipper firmware for Fly-CDYv3
Tip: To read more about the KCONFIG_CONFIG option, see here
- ssh to your klipper host console
-
cd to the klipper directory
cd ~/klipper -
Run make clean
make clean KCONFIG_CONFIG=config.cdyv3
Important: If when running the above command you get this output
Then you need to set all the correct settings when running make menuconfig below.
Otherwise, skip to compiling klipper.
Using default symbol values (no 'config.cdyv3'). Configuration saved to 'config.cdyv3' Then you need to set all the correct settings when running make menuconfig below.
Otherwise, skip to compiling klipper.
-
Open menuconfig
make menuconfig KCONFIG_CONFIG=config.cdyv3 - Set the following settings
- [*] Enable extra low-level configuration options
- Micro-controller Architecture (STMicroelectronics STM32)
- Processor model (STM32F407)
- Bootloader offset (32KiB bootloader)
- Clock Reference (8 MHz crystal)
- Communication interface (USB (on PA11/PA12))
- USB ids
-
() GPIO pins to set at micro-controller startup
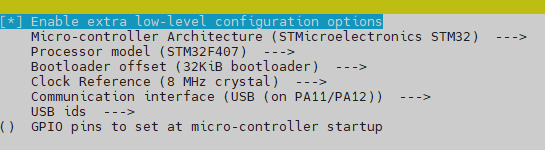
Klipper Menu Config USB
- Quit and save the configuration
-
Run Make to compile the firmware
make KCONFIG_CONFIG=config.cdyv3 -j4

Flash Klipper to the Fly-CDYv3 MCU
- ftp to your klipper host with an FTP client like FileZilla
- open the folder ‘~/klipper/out’.
- download klipper.bin to your PC.
- place the MCU MicroSD card into a card reader and connect it to your PC.
- ensure that the SD Card is formatted as Fat32. If in doubt use the SD Card Formatter.
- Copy the klipper.bin file to the root of the SD card.
- rename klipper.bin to firmware.bin
- Eject the SD card from the PC
-
Insert the SD card into the Fly-CDYv3 SD card Slot.
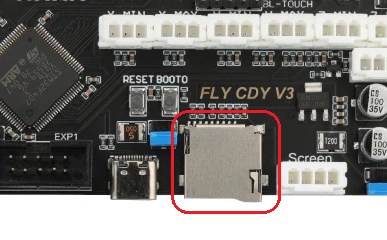
FLy-CDYv2 SD card -
Press the MCU reboot button
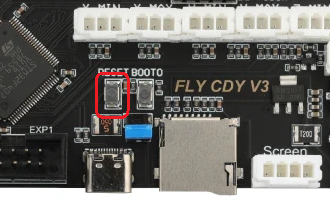
Fly-CDYv2 reset -
Wait a few minutes
-
Open a putty SSH session to your klipper host and log on
- run lsusb to verify the MCU has been discovered as a klipper device
