Fly-Puppet with CM4
Edit me
Configuring and installing Rasberry Pi CM4 for the Fly-Puppet
Mounting the Rasberry Pi CM4 to the Fly-Puppet
-
The Rasberry Pi CM4 mounts to the sockets on the bottom of the Fly-Puppet
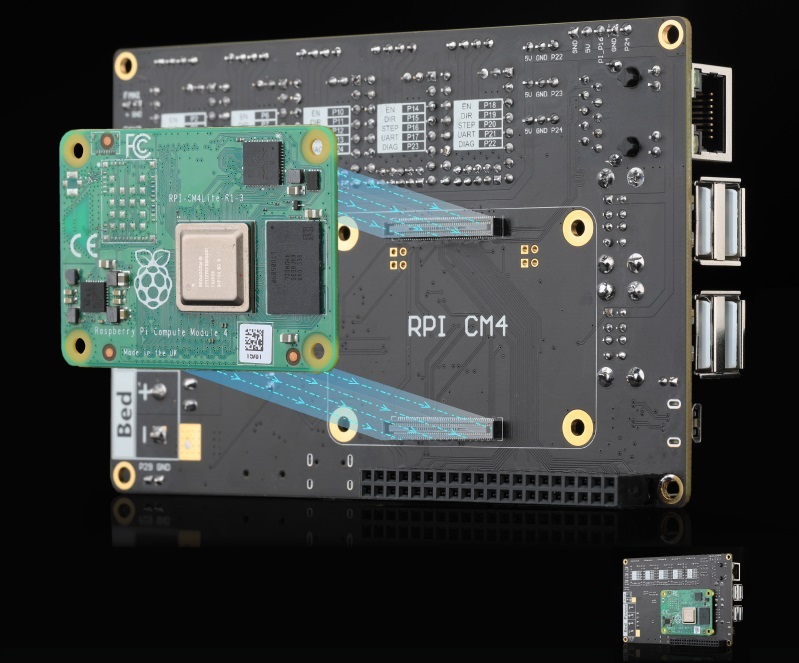
Mounting the CM4 to the Fly puppet

CM4 onboard EMMC programming
- If your CM4 does not have emmc, but use SD card, please skip this step and [start reading step 2]{./fly-puppet_klipper_cm4.html#cm4-onboard-emmc-programming}
- Turn on DIP switches 5 and 6 on the Puppet board to connect the Pi to the Pullet USB C port. Make sure DOP switches 1 and 2 are in the OFF position.
-
Use tweezers to short-circuit PI_BOOT, as shown in the figure below. (In order to ensure the safety of the motherboard inserted into CM4, there is no pin header by default)

Booting the CM4 - Connect Fly-Puppet to the computer using a type-c data cable
- Download rpiboot
-
Run RpiBoot directly after downloading, if everything is normal, the words success will appear as pictured below
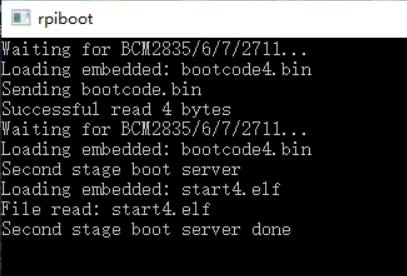
Rasberry Pi Boot Success - After running successfully, the emmc of CM4 will be directly mounted as a U disk to the system, which can be directly burned into the system


.
Write OS to SD or EMMC
- If you are using an SD card, mount the SD card on your PC.
- Chose an Operating system to load, It is recommended to use mainsailos or fluiddpi
- After the burning is completed, please do not start the system, complete the following settings
Post image Burn configuration
Perform these steps before starting up the Rasberry Pi
- Open the mounted EMMC Drive or SD card on your PC.
- Open the config.txt file in the /boot directory and add following two lines configuration
dtoverlay=pi3-miniuart-bt
dtoverlay=dwc2,dr_mode=host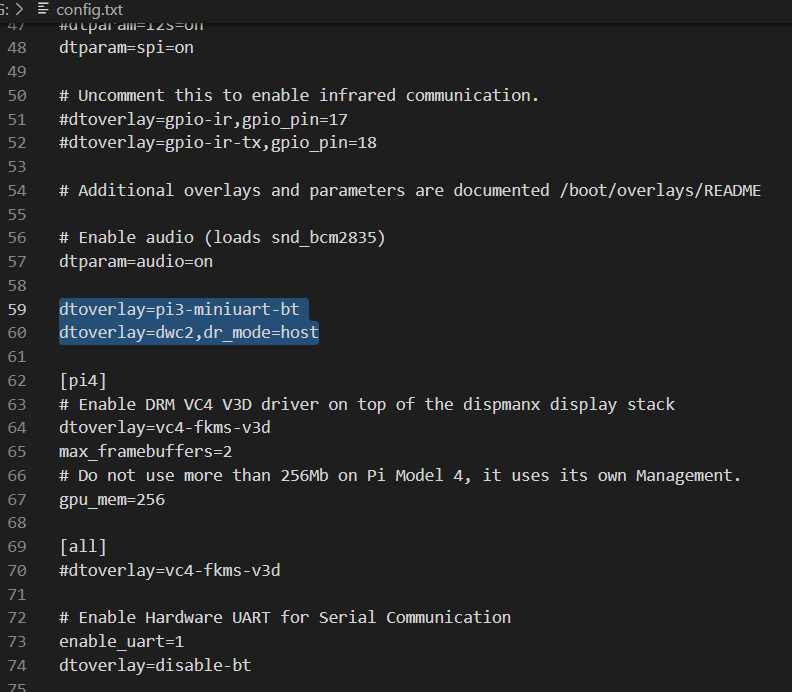
Edit config.txt - Create a new blank file under the boot disk, the file name is SSH , no suffix
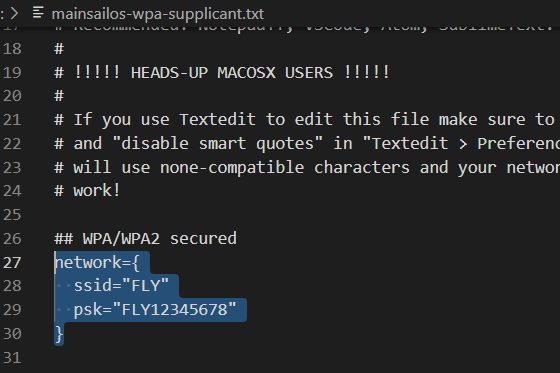
- WIFI Setup
- MainsailOS modify /boot/mainsailos-wpa-supplicant.txt
- FluiddPi modify /boot/fluiddpi-wpa-supplicant.txt
- Delete the # in front of these 4 lines
- Change ssid and psk to your WiFi name and password respectively

Edit WIFI configuration file - The preparations are complete, If you used an SD card now you can install the SD card into Fly-Puppet SD Slot and start it up

Compile Klipper firmware for Linux MCU
Note: Repeat these steps if a klipper update requires flashing new firmware to the MCU.
- ssh to your klipper host console
- cd to the klipper directory
cd klipper - Run make clean
make clean - Open menuconfig
make menuconfig - Set the following settings
- Enable extra Low Level configuration options : Un-Checked
-
Micro Controller : Linux Process

Configure Linux MCU Firmware
- Quit and save the configuration

Flash The Rasberry Pi CM4 as a Lunix MCU
- run the following command to flash the Rasberry Pi CM4
sudo service klipper stop make flash sudo service klipper start - Add the following to your Fly-Puppet printer.cfg file to connect the Rasberry Pi CM4 as an MCU in klipper.
[mcu host]
serial: /tmp/klipper_host_mcu