Fly Gemini V2 Klipper host
Edit me
Configuring and installing Klipper for CAN bus
Compile Klipper firmware for can
Note: Repeat these steps if a klipper update requires flashing new firmware to the MCU.
- ssh to your klipper host console
- cd to the klipper directory
cd klipper - Run make clean
make clean - Open menuconfig
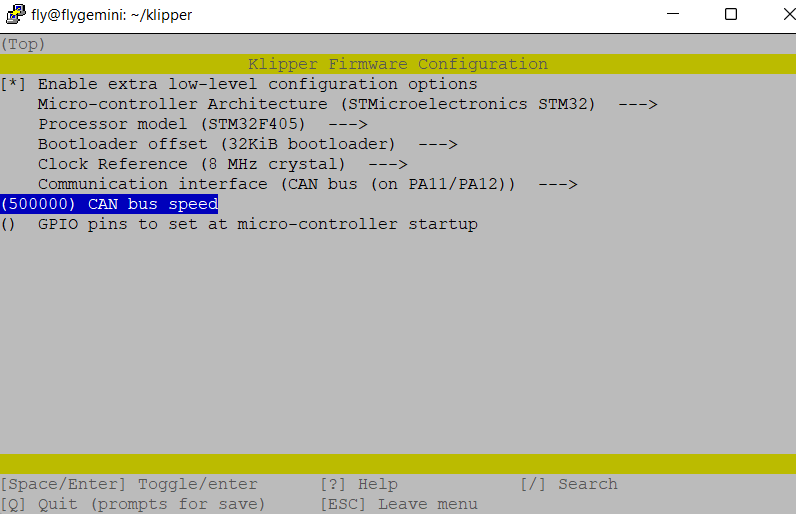
make menuconfig - Set the following settings
- Enable extra Low Level configuration options : Checked
- Micro Controller : STMicroelectronics STM32
- Processor Model: STM32F405
- Bootloader Offset: 32 Kib bootloader
- Clock Ref: 8 MHz crystal
-
Comm Interface - CAN on PA11/PA12
-
CanBus Speed: 500000

Klipper Menu Config CAN
-
Quit and save the configuration
- Run Make to compile the firmware
make -j4
Flash Klipper firmware with CanBoot over CAN bus
- Get the Fly Gemini V2 UUID buy running the following script.
~/CanBoot/scripts/flash_can.py -i can0 -q - If CAN devices are detected the above command will return the following.
Detected uuid: 8248a4b16ede, Application: CanBoot
Flash Can Query -
Each device will have a unique uuid. In the above example, 8248a4b16ede is the micro-controller’s canbus uuid.
-
Save the UUID for the next step.
- Flash the klipper FW to the Fly Gemini V2 by running the following command.
python3 ~/CanBoot/scripts/flash_can.py -i can0 -f ~/klipper/out/klipper.bin -u {paste your UUID here}Example
python3 ~/CanBoot/scripts/flash_can.py -i can0 -f ~/klipper/out/klipper.bin -u 6248a4b16ede - You should get a download progress bar and File downloaded successfuly when the burning is complete.
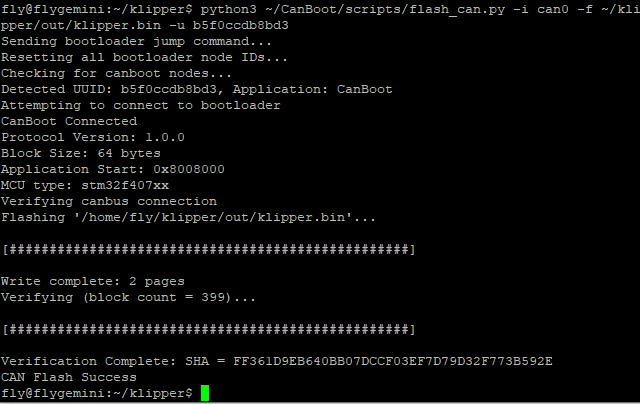
Burn Klipper firmware over CAN bus - Your Fly Gemini V2 should now have klipper firmware loaded and be ready to use.

